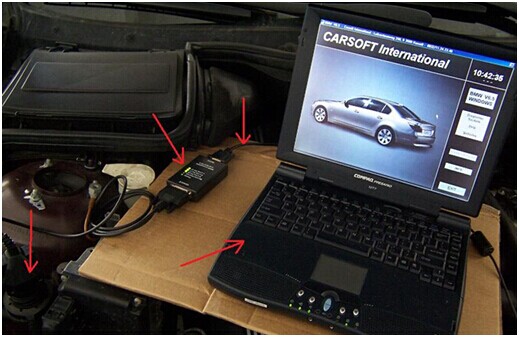
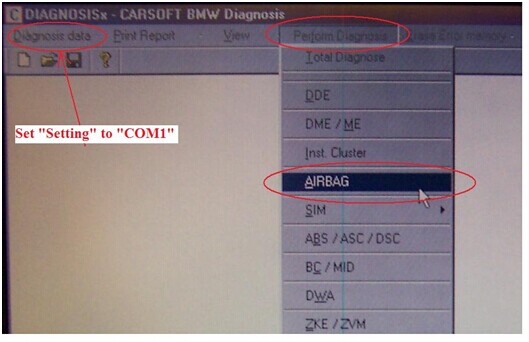
I have Air Bag Light on the dash for almost 2 years now. Scanned with Carsoft Version 6.5, turned out to be Drivers Buckle. I then decided to replace a new buckle myself.
Parts/ Tools I use:
-PN 72118240045: $150 at local BMW Dealer. Don’t even try to buy this online, because of the explosive charge inside the assembly, most online vendors won’t ship it. So buy it from BMW dealer only! This part varies from year to year, so ask your BMW dealer for help.
– Carsoft V6.5. This can be purchased from ebay, amazon or independent OBD2 tool sites. I got mine from here http://www.obd2eshop.com/wholesale/bmw-carsoft-6-5.html, $45 with free shipping, much cheaper than that on amazon.
– Torx Bit T30 (used with 1/4 ratchets)
– Torx Socket T50.
– 10-mm wrench for battery
– Screw driver, Pliers etc.
– Piece of 2×4 wood 8 inches long
– Zip Ties
Warnings:
– At appropriate time, you must disconnect the battery ground cable. Read on.
Procedures:
- Move Seat all the way back.
- Remove “Cosmetic Cover” using T30 bit. On the INNER side, it is tricky with tight clearance, so use a 1/4 ratchet. Then wiggle the plastic cover forward to remove. Now you have exposed the T50 bolts holding the driver seat frame. There are a total of four (4) T50 bolts: two (2) in Front and two (2) in Rear.
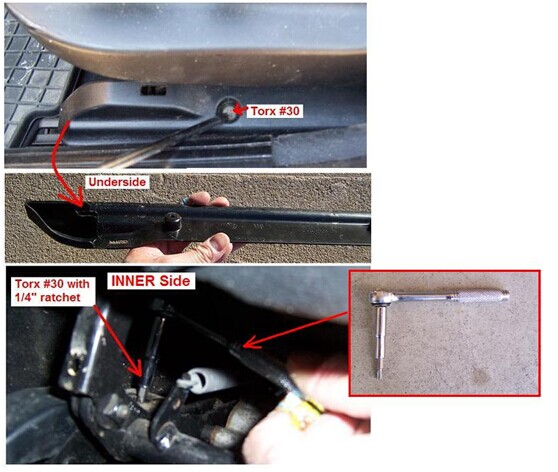
- Remove two (2) T50 Front bolts. Then move the seat all the way Forward.
- The two (2) T50 Rear bolts are under a plastic cover. Gently pry the plastic cover up and remove it (it just snaps in).
- Now there are two (2) ways to do this, some people remove the seat from the car completely, but I find this is more work than necessary. I did this with the seat in the car using a piece of 2×4 wood that is 8 inches tall.
Since you will move the seat further Back, you will need to undo the “seatbelt height adjustment cable” thingy. Under the seat, there is a cable that connects to the seatbelt height adjustment. The “Fixing Pin” rotates and locks into the “Fixing Clip”. Note how it is setup for re-assembly. Simply rotate the “Fixing Pin” to unlock it. Then pull the “Fixing Pin” out. The “Fixing Clip” will come off.
Confused? Look at the opposite seat for reference.
- Now Pull the seat as far back as possible (watch the wiring coming from the floor, don’t yank it!).
Place the 2×4 wood under the rail to lift the seat up. This allows the T50 socket to go in to remove the Pretensioner.
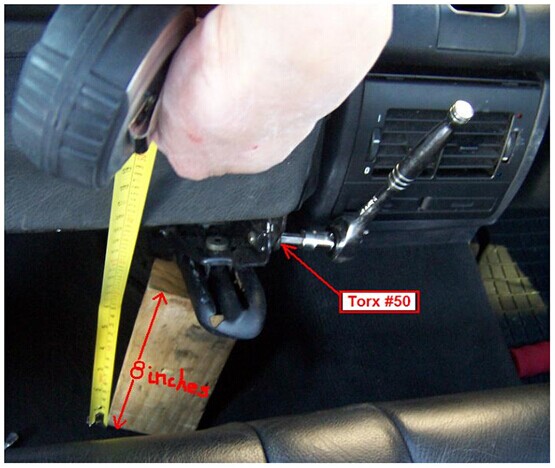
- Now, STOP! Go to the trunk and disconnect the Battery Ground Cable (10-mm wrench).
- In order to remove the old Pretensioner, you need to:
– Undo the Velcro
– Cut the Zip Tie
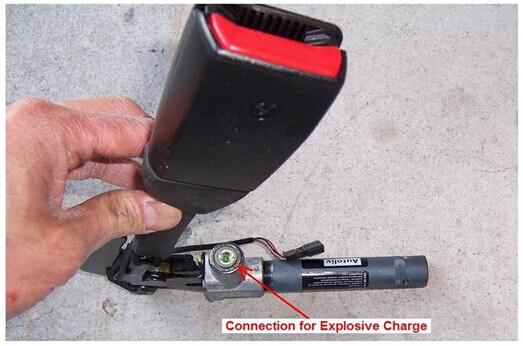
– Disconnect the 2 connectors (1 for explosive charge and 1 for buckle). They are very easy to disconnect.
- Now look at the old and new Pretensioner:
– Old Pretensioner has “wire chafing”, this may be why I have the above SRS codes.
– New Pretensioner has Protective Sheathing.
– Transfer the Old Plastic Clip to New Pretensioner.
– Connect the 2 connectors
– Add zip tie.
- Now, install the New Pretensioner: there are 2 notches (Blue arrows) that must match the tabs on the seat.
- Re-connect:
– “Seatbelt height adjustment cable” thingy.
– Battery
– Four (4) T50 bolts
– Cosmetic covers
– Velcro around the base of the buckle
- Get Carsoft Version 6.50 to turn off Air Bag Light.
The bottom line for me:
– Laptop Compaq Evo N600C from 2003 with the 9-pin RS232 port
– XP Operating System
– Install software as instructed: copy from disc to C:\. See attached pdf.
– Then copy the 10 “crack” files as instructed.
– You must launch Carsoft from C:\cm75f directory. If you launch the software from “Start\All Programs\Carsoft”, the software will crash LOL! So, for this part of launching software, do not follow the pdf file.
– Go to C:\cm75f directory, find the Carsoft.exe file and launch the software from there. Listen to me, it took me a long time to figure this out!!!
– Battery must be fully charged!
– Key in Ignition Position II
– Erase Air Bag codes.
– Go to dash, the Air Bag should be off.
That is it, done!


